1. 系统简介
Sentry是一个开源的监控系统,可以收集项目中的异常信息,便于开发人员第一时间发现问题,定位问题,解决问题。当前文档基于Sentry 23.11.2进行说明。
2. 系统搭建
虽然Sentry官方提供了在线系统,但是因为需要翻墙,加上如果是公司项目,考虑到安全问题,还是倾向于私有化部署,在Github上有一个开源项目用于部署Sentry,可以使用该项目进行部署:
git clone https://github.com/getsentry/onpremise.git
因为这个项目涉及很多后端的技术知识,Sentry搭建最好是后端人员来做,然后部署到服务器上面去。
3. 创建项目
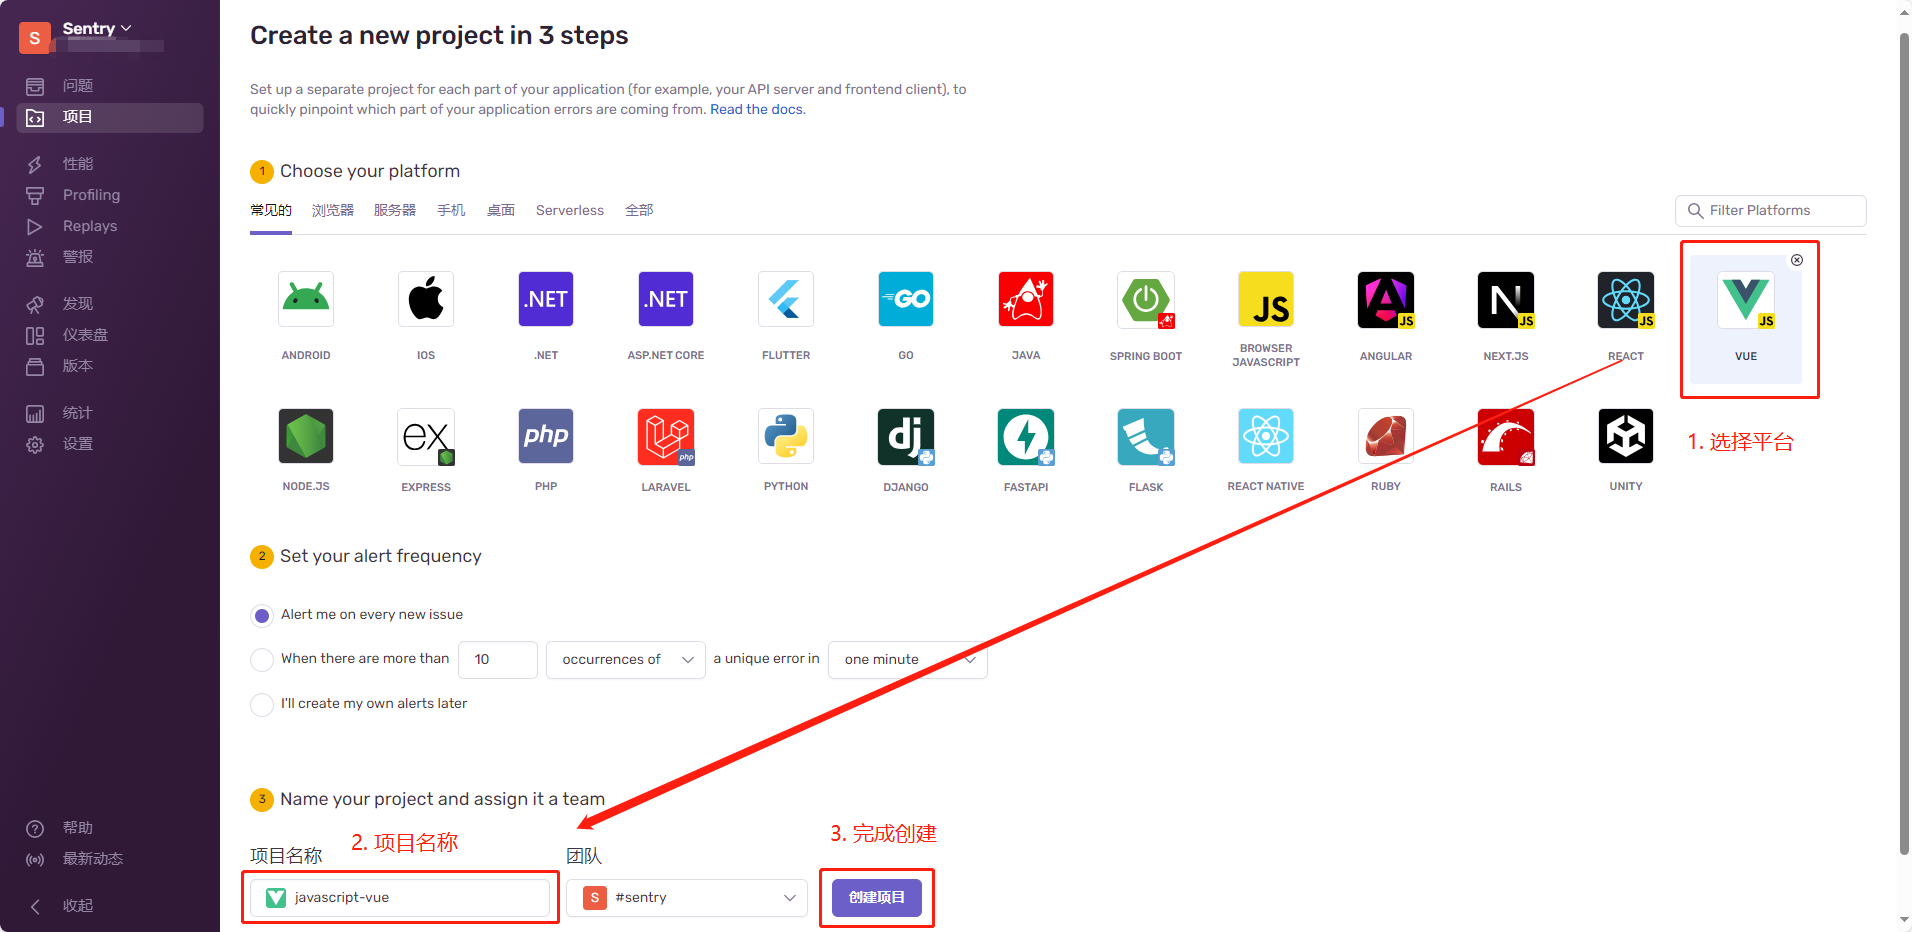
Sentry搭建成功,部署到服务器,比如当前Sentry在线系统为https://123.11.22.133,使用账号test001登录,一开始默认是英文显示,如果想要切换为中文,只需要在左上角的User settings里的Language选项选择Simplified Chinese即可,然后创建项目,其他平台同理,如下图所示:
4. Vue3项目引入Sentry
项目创建完成后,会跳转至 Vue SDK 配置的说明文档,默认勾选三个监控模块,并且提供Vue3和Vue2版本的引入方式,如下图所示:

三个监控模块的简单功能说明,如下所示:
- Error Monitoring: 自动报告项目错误和异常。
- Performance Monitoring: 通过性能监控,
Sentry跟踪你的软件性能,测量吞吐量和延迟等指标,并显示错误对多个系统的影响。Sentry捕获由事务和span组成的分布式跟踪,这些跟踪测量单个服务以及这些服务中的单个操作。在分布式跟踪中了解更多关于我们的模型的信息。 - Session Replay: 会话重播通过像视频一样重现用户浏览器在错误发生前、发生中、发生后的情况,帮助你更快地找到错误或延迟问题的根本原因。受浏览器开发者工具的启发,你可以在一个组合的
UI中回放应用程序的DOM状态,并查看关键的用户交互,如鼠标点击、滚动、网络请求和控制台条目。
首先,我们需要依照文档进行配置,安装依赖
# Using npm
npm install --save @sentry/vue

# Using yarn
yarn add @sentry/vue
然后,在main.ts里引入Sentry.init(),如下所示:
import { createApp } from "vue";
import { createRouter } from "vue-router";
import * as Sentry from "@sentry/vue";

const app = createApp({
  // ...
});
const router = createRouter({
  // ...
});

Sentry.init({
  app,
  dsn: "https://examplePublicKey@o0.ingest.sentry.io/0",
  integrations: [
    Sentry.browserTracingIntegration({ router }),
    Sentry.replayIntegration(),
  ],

  // Set tracesSampleRate to 1.0 to capture 100%
  // of transactions for tracing.
  // We recommend adjusting this value in production
  tracesSampleRate: 1.0,

  // Set `tracePropagationTargets` to control for which URLs trace propagation should be enabled
  tracePropagationTargets: ["localhost", /^https:\/\/yourserver\.io\/api/],

  // Capture Replay for 10% of all sessions,
  // plus for 100% of sessions with an error
  replaysSessionSampleRate: 0.1,
  replaysOnErrorSampleRate: 1.0,
});

app.use(router);
app.mount("#app");
此时,只要项目在本地运行或部署至线上,打开项目,然后打开浏览器控制台,查看Network列表,会发现很多类似这样的请求,并没有报错,这就意味着当前已经正常上报到Sentry系统了,如下所示:
/api/6/envelope/?sentry_key=485eee5b72d4758f53483e6ee56c43ed&sentry_version=7&sentry_client=sentry.javascript.vue%2F7.85.0
5. 异常报错示例
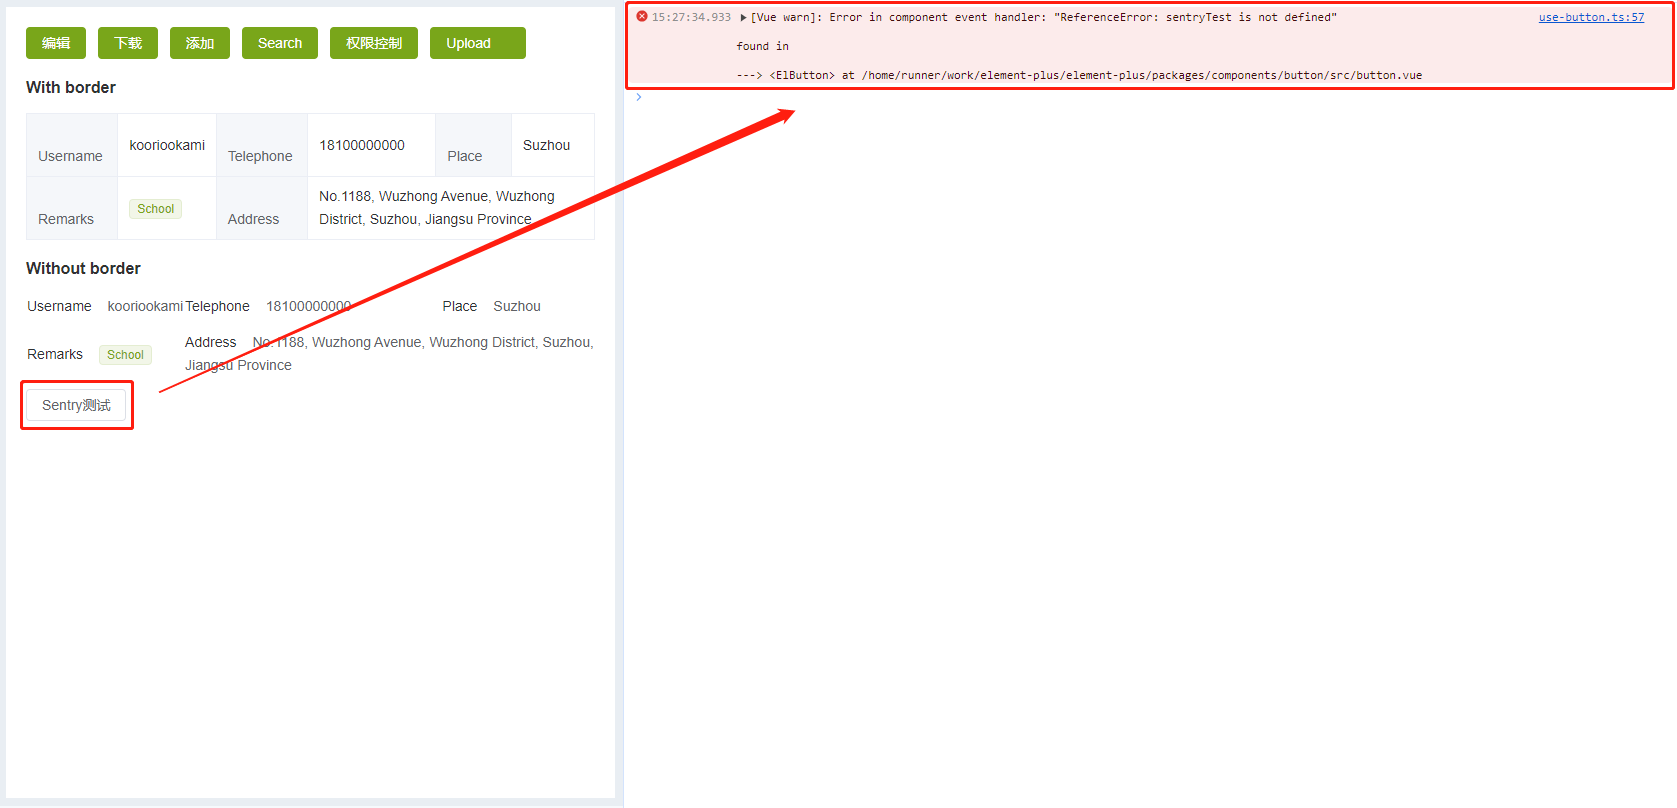
为了真实验证Sentry的功能,现以一个真实场景来演示,在项目中添加一个按钮,然后设置点击事件之后,触发打印console,sentryTest并未定义,所以会报错,代码如下所示:
<template>
    <el-button @click="sentryClicked">Sentry测试</el-button>
</template>
<script setup lang="ts">
import { defineComponent, ref } from 'vue'

function sentryClicked() {
    console.log('sentryClicked: ', sentryTest);
}

</script>
在项目页面,我们可以看到,在浏览器控制台,确实有报错信息生成,如下图所示:
然后,我们到Sentry在线系统查看,确实有收到报错信息,如下图所示:
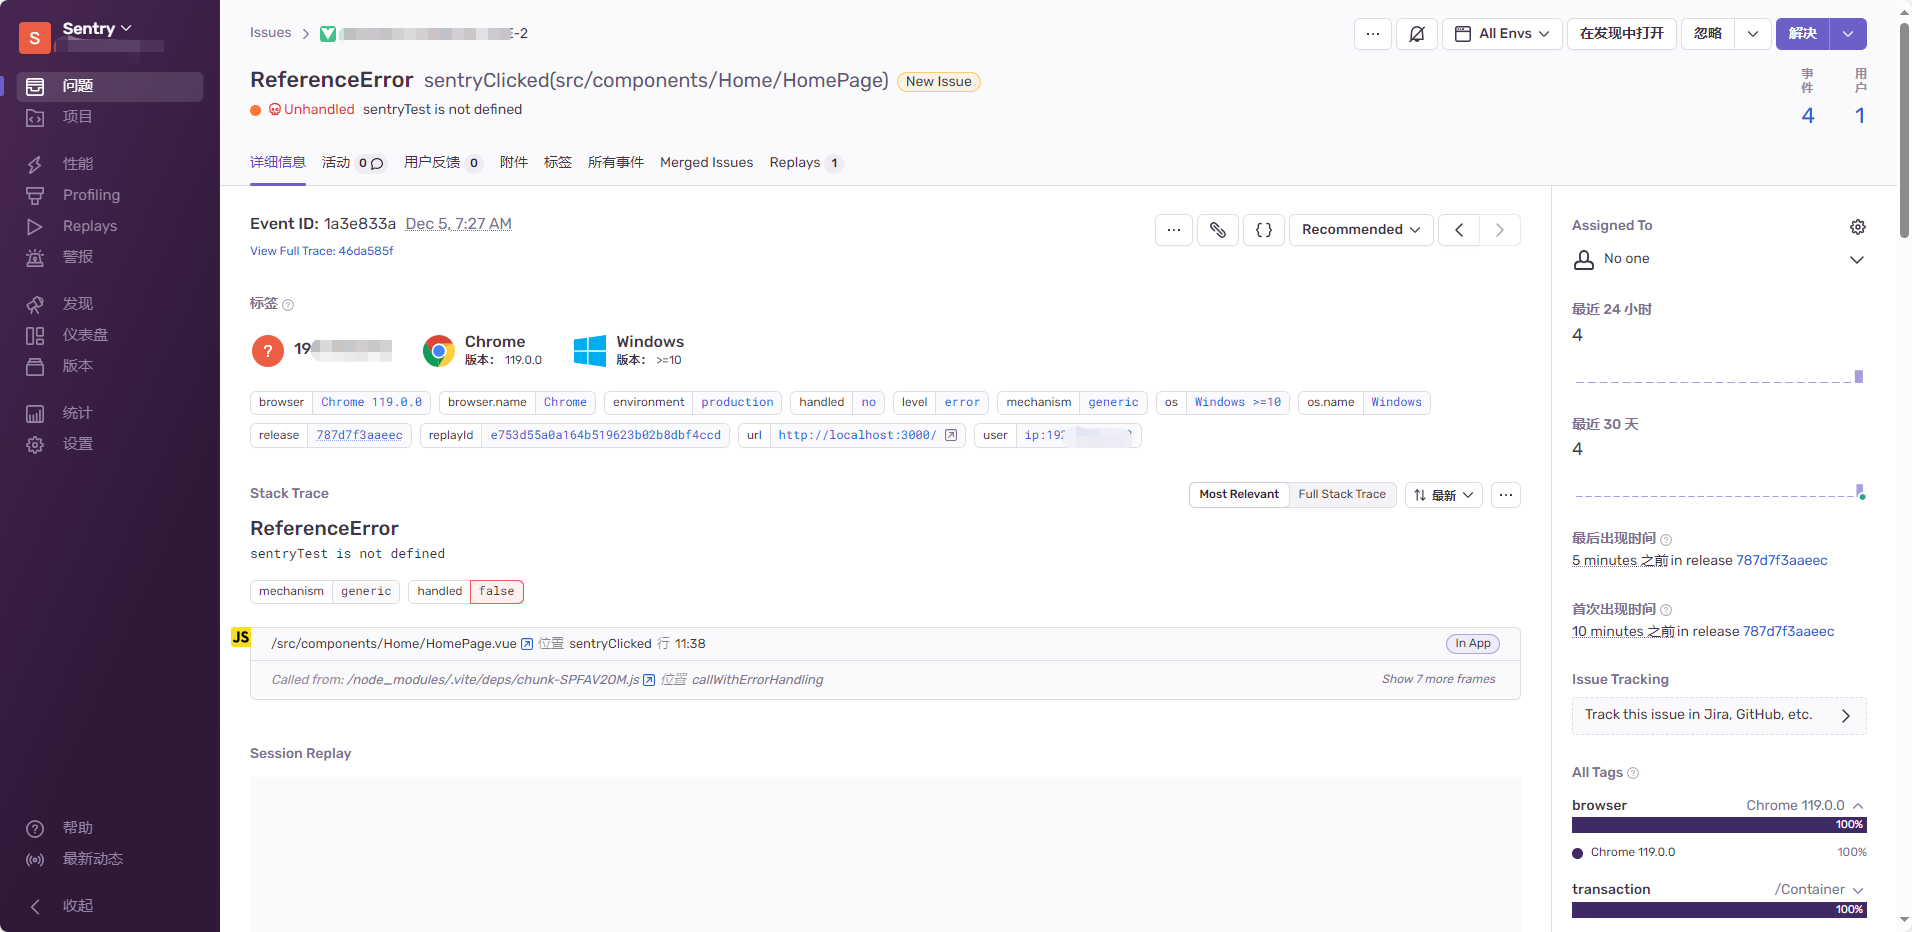
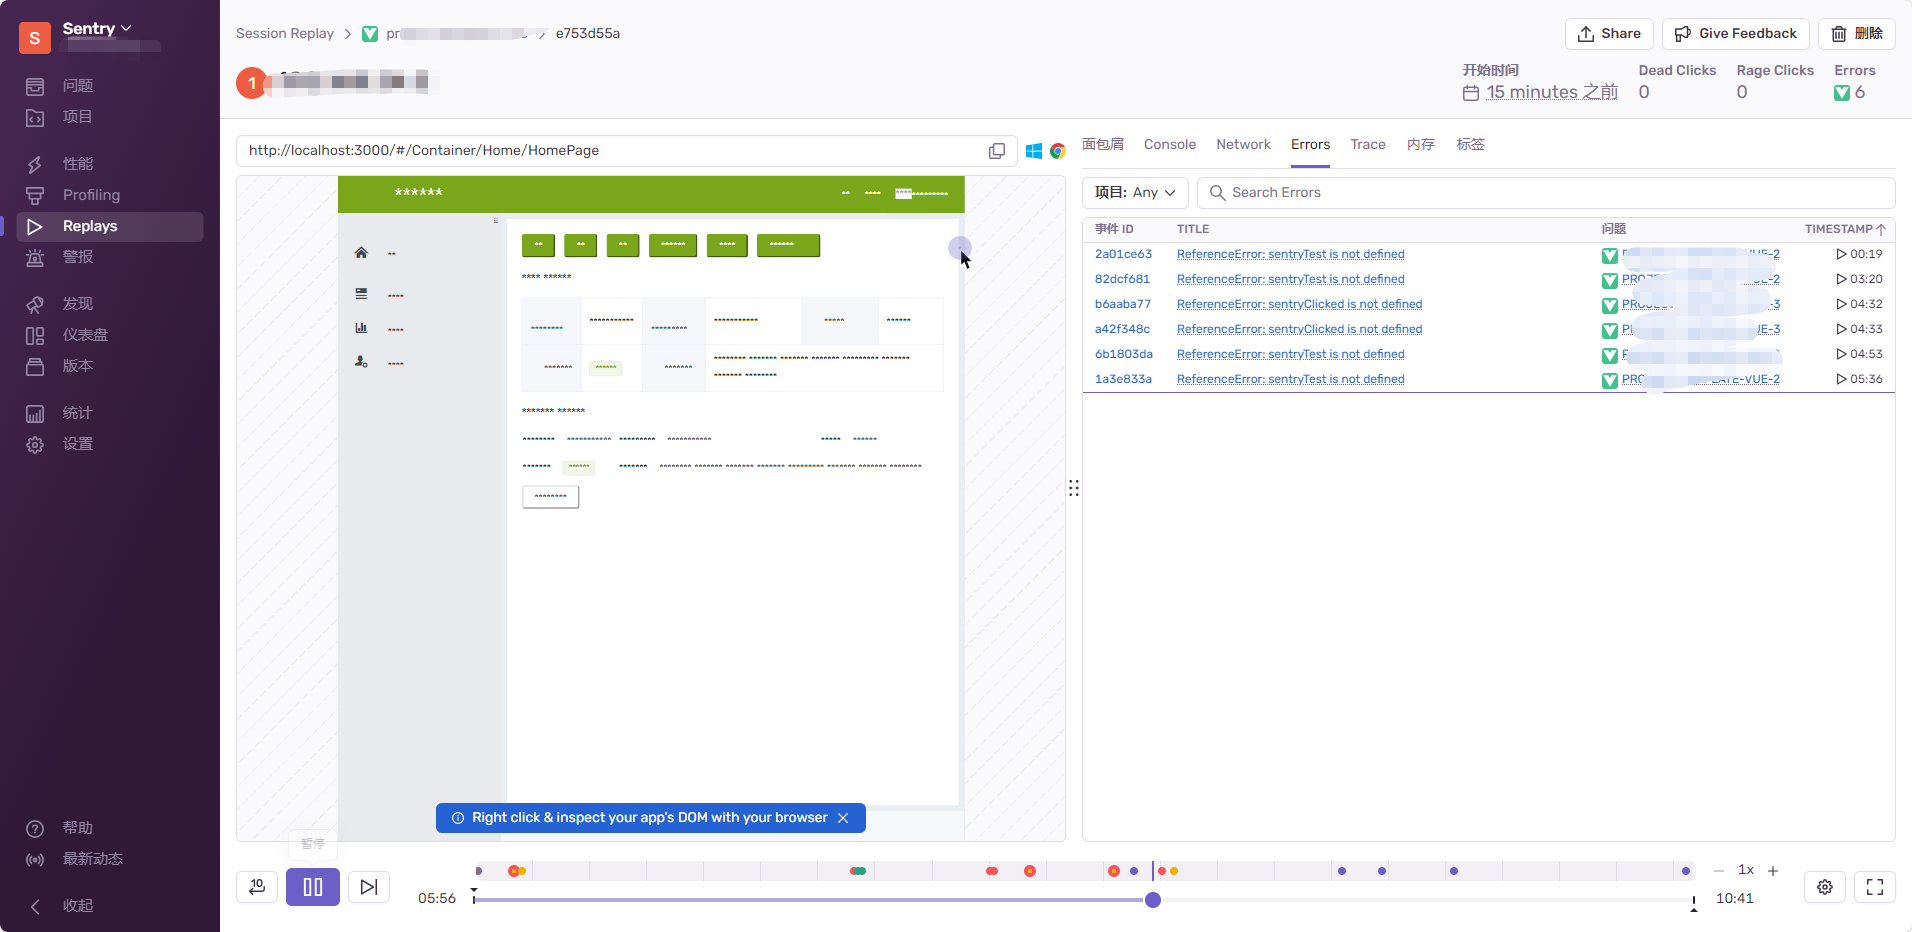
里面指明了报错原因是 sentryTest is not defined ,然后还提交了用户的IP、浏览器版本以及版本号、平台系统等等信息,便于分析异常错误。还可以使用Session Replay重现用户浏览器在错误发生前、发生中、发生后的情况,如下所示:
6. 上传SourceMap文件
通常Sentry在线系统上面的信息,也是可以排查解决BUG的,比如sentryTest is not defined,我们只需要在项目中搜索sentryTest就可以定位到代码报错的位置,但是如果是一些比较通用的,或者信息比较含糊的,是没办法精准定位代码位置的,这个时候,就可能有想法了,怎么让才能在Sentry在线系统看到,到底是执行到哪一步的时候,报错了呢?
这就是本节所需要实现功能,这就需要 SourceMap 文件,什么是 SourceMap 文件呢?
因为使用Vite打包之后,所有代码都压缩在一起,很难从中定位到异常代码的位置,Sentry通过.map文件中的映射关系将编译后的代码行映射回源代码行,从而提供准确的错误定位信息。可以帮助开发人员更轻松地理解和修复生产环境中的错误。
首先,需要在Vue3项目的 vite.config.ts 里进行设置,如下所示:
export default defineConfig({
  build: {
    sourcemap: true, // Source map generation must be turned on
  },
})
然后运行 npm run build 命令,在生成的 dist/assets/里就会发现后缀为.map的文件,如下图所示:
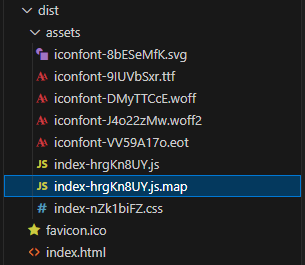
然后我们需要把.map文件上传到 Sentry 在线系统。
6.1 通过sentry-wizard自动上传至Sentry【推荐】
在官方提供的 Configure Vue SDK页面中已经推荐使用sentry-wizard来自动上传SourceMap至Sentry,具体实现步骤如下所示:
安装依赖
npx @sentry/wizard@latest -i sourcemaps会在终端生成很多提示,提示信息都很清晰,依次选择即可,分别有:
- Do you want to continue anyway?
(Yes) - Are you using Sentry SaaS or self-hosted Sentry?
(Self-hosted/on-premise/single-tenant) - Please enter the URL of your self-hosted Sentry instance.
(https://123.11.22.133) - Do you already have a Sentry account?
(Yes) - Select your Sentry project.
(test) - Which framework, bundler or build tool are you using?
(Vite) - The @sentry/vite-plugin package is already installed.
(Yes) - Updated @sentry/vite-plugin with NPM.
- Added the Sentry Vite plugin to vite.config.ts and enabled.
- Added auth token to .env.sentry-build-plugin
- Added .env.sentry-build-plugin to .gitignore.
- Are you using a CI/CD tool to build and deploy your application?
(No)
- Do you want to continue anyway?
然后我们会看到
vite.config.ts里@sentry/vite-plugin插件的配置,如下所示:import { sentryVitePlugin } from "@sentry/vite-plugin"; export default defineConfig({ plugins: [ sentryVitePlugin({ org: "sentry", project: "project-template-vue", url: "https://123.11.22.133" })],此时需注意,因在设置
self-hosted Sentry时,输入的是https://123.11.22.133,但是sentry-wizard自动在vite.config.ts中生成填写的url值为https://123.11.22.133/,需要去掉/,避免运行npm run build时报错:error: Two different url values supplied: `https://123.11.22.133` (from token), `https://123.11.22.133/`.在源码目录下,还自动生成了文件
.env.sentry-build-plugin,并且.gitignore.里进行忽略。
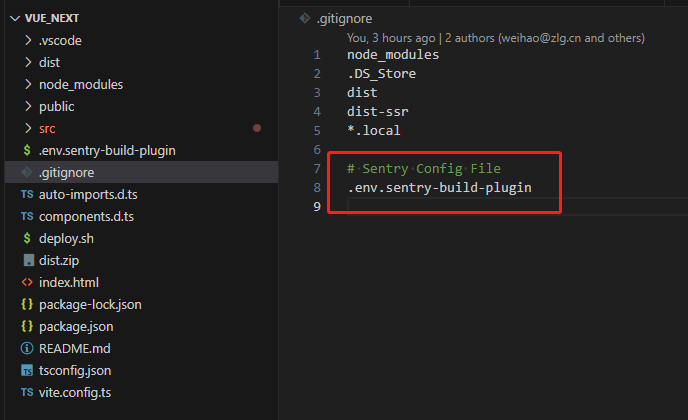
运行
npm run build打包上传,如下所示,当上传SourceMap完成之后,会有相应详细的信息进行说明。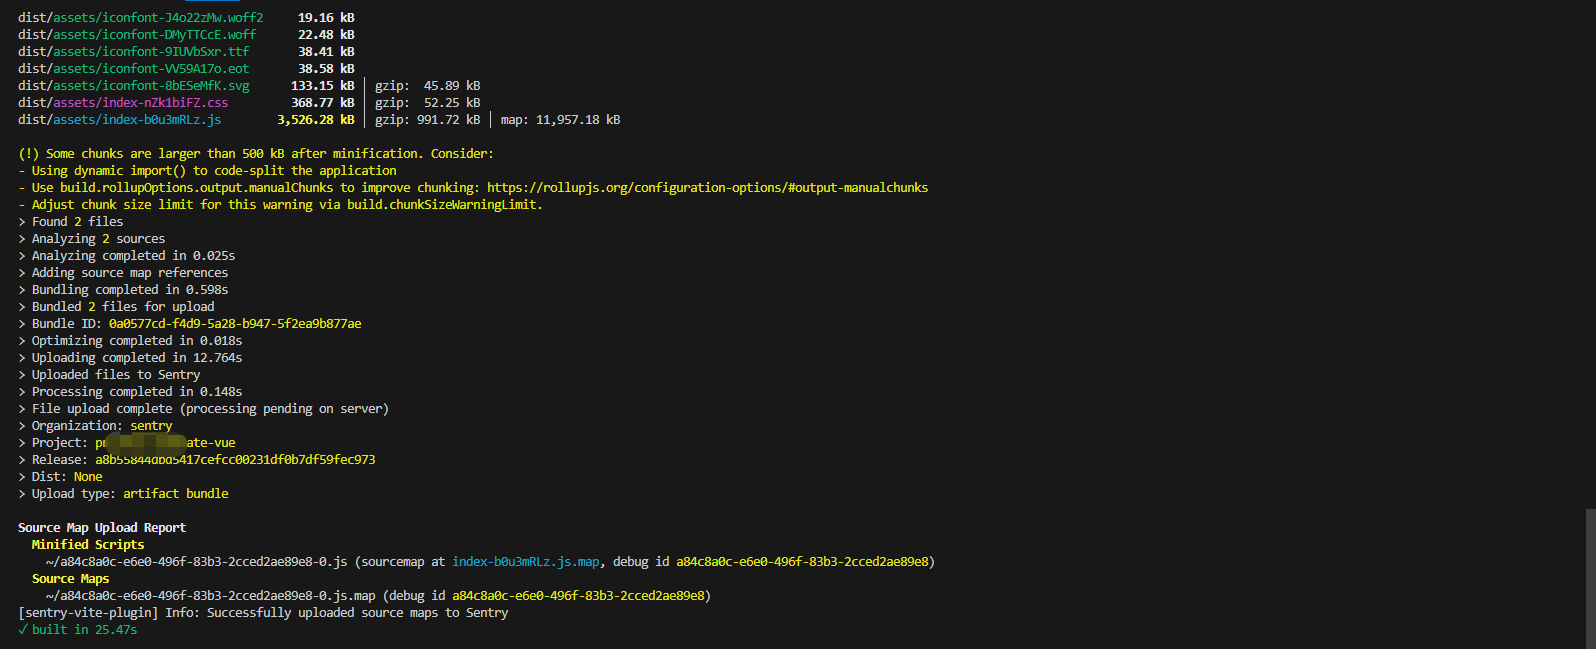
通过在
Sentry上面查看项目的SourceMap页面,查看Releases的值为a8b55844dbd5417cefcc00231df0b7df59fec973,来确定本次上传的版本,如下图所示,已经上次成功。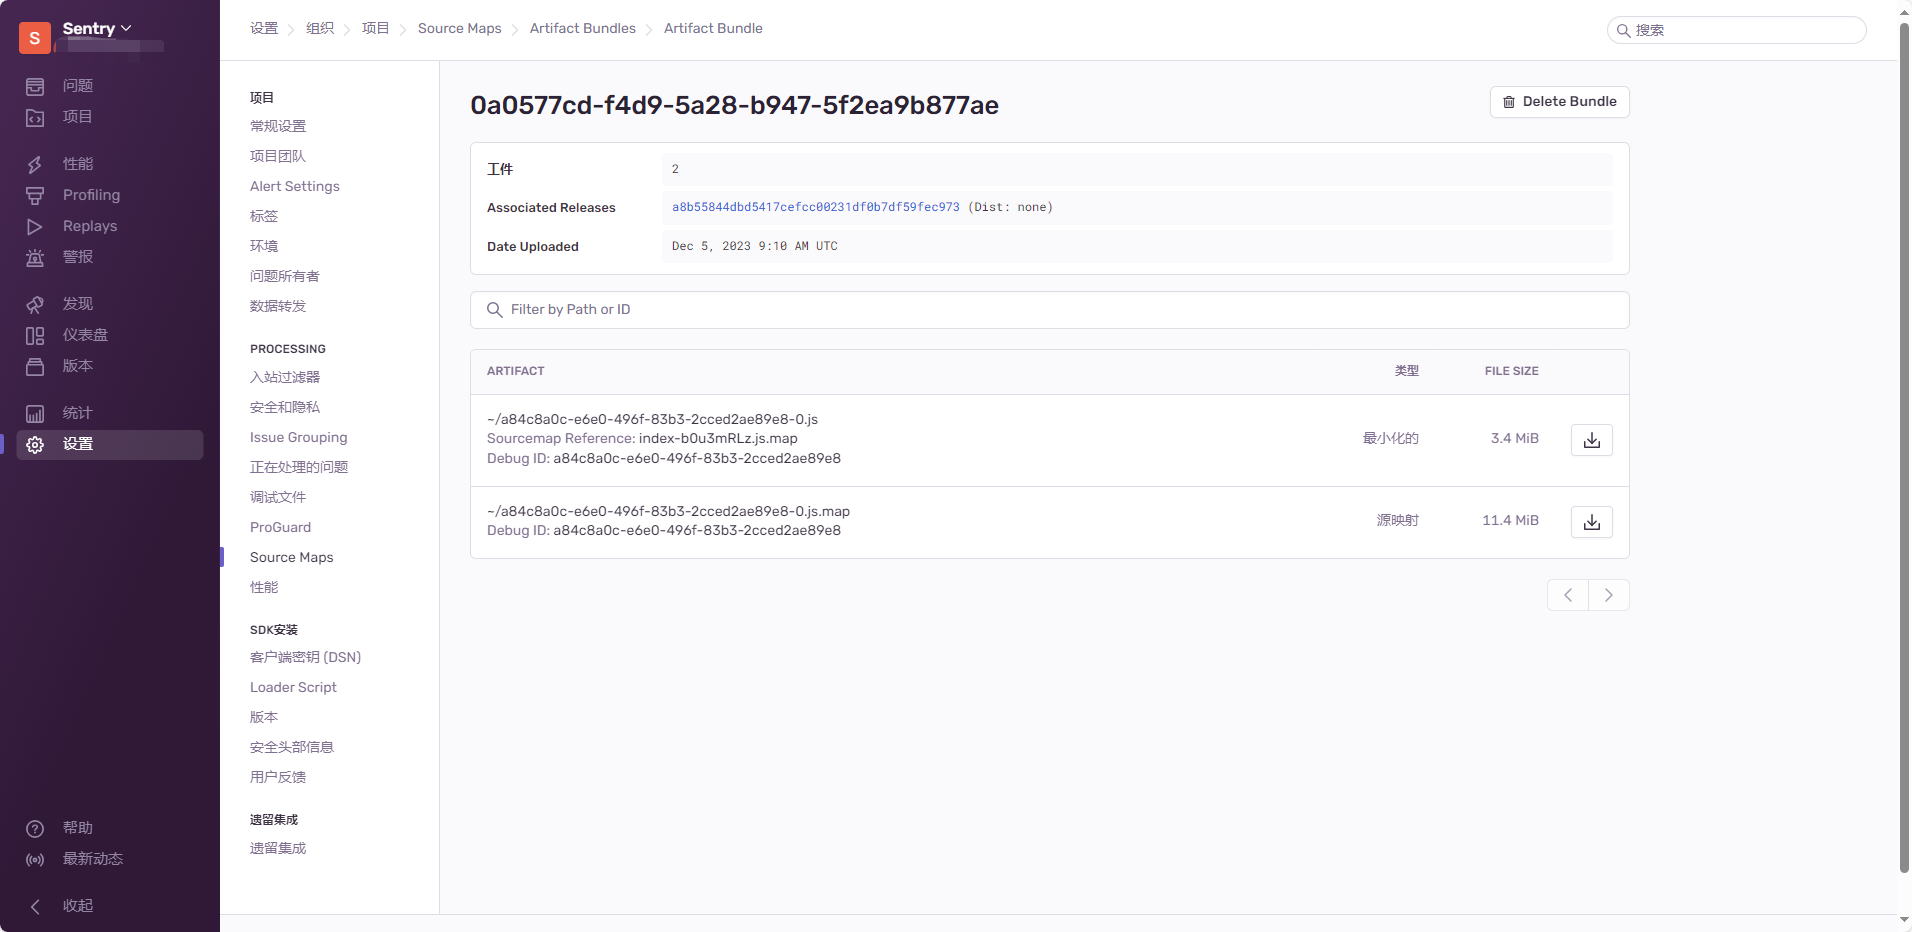
验证
sentryTest is not defined异常报错示例,我们可以看到在异常详情页,会直接定位到源码报错的位置,如下所示:
6.2 通过Sentry Cli上传至Sentry
登录Sentry在线系统,以mac环境为例,在终端输入如下:
# mac
sentry-cli --url http://123.11.22.133:211/login

# windows, 在 node_modules 里找到 sentry-cli.exe,右键Copy Path.
~\node_modules\@sentry\cli-win32-x64\bin\sentry-cli.exe --url https://123.11.22.133:211/ login
然后会提示输入token,如下所示:
dstweihao@weihao-mac-mini vue % sentry-cli --url http://123.11.22.133:211/ login
This helps you signing in your sentry-cli with an authentication token.
If you do not yet have a token ready we can bring up a browser for you
to create a token now.

Sentry server: 123.11.22.133
Open browser now? [y/n] n
Enter your token:
token是在Sentry在线系统生成的,如下图所示:
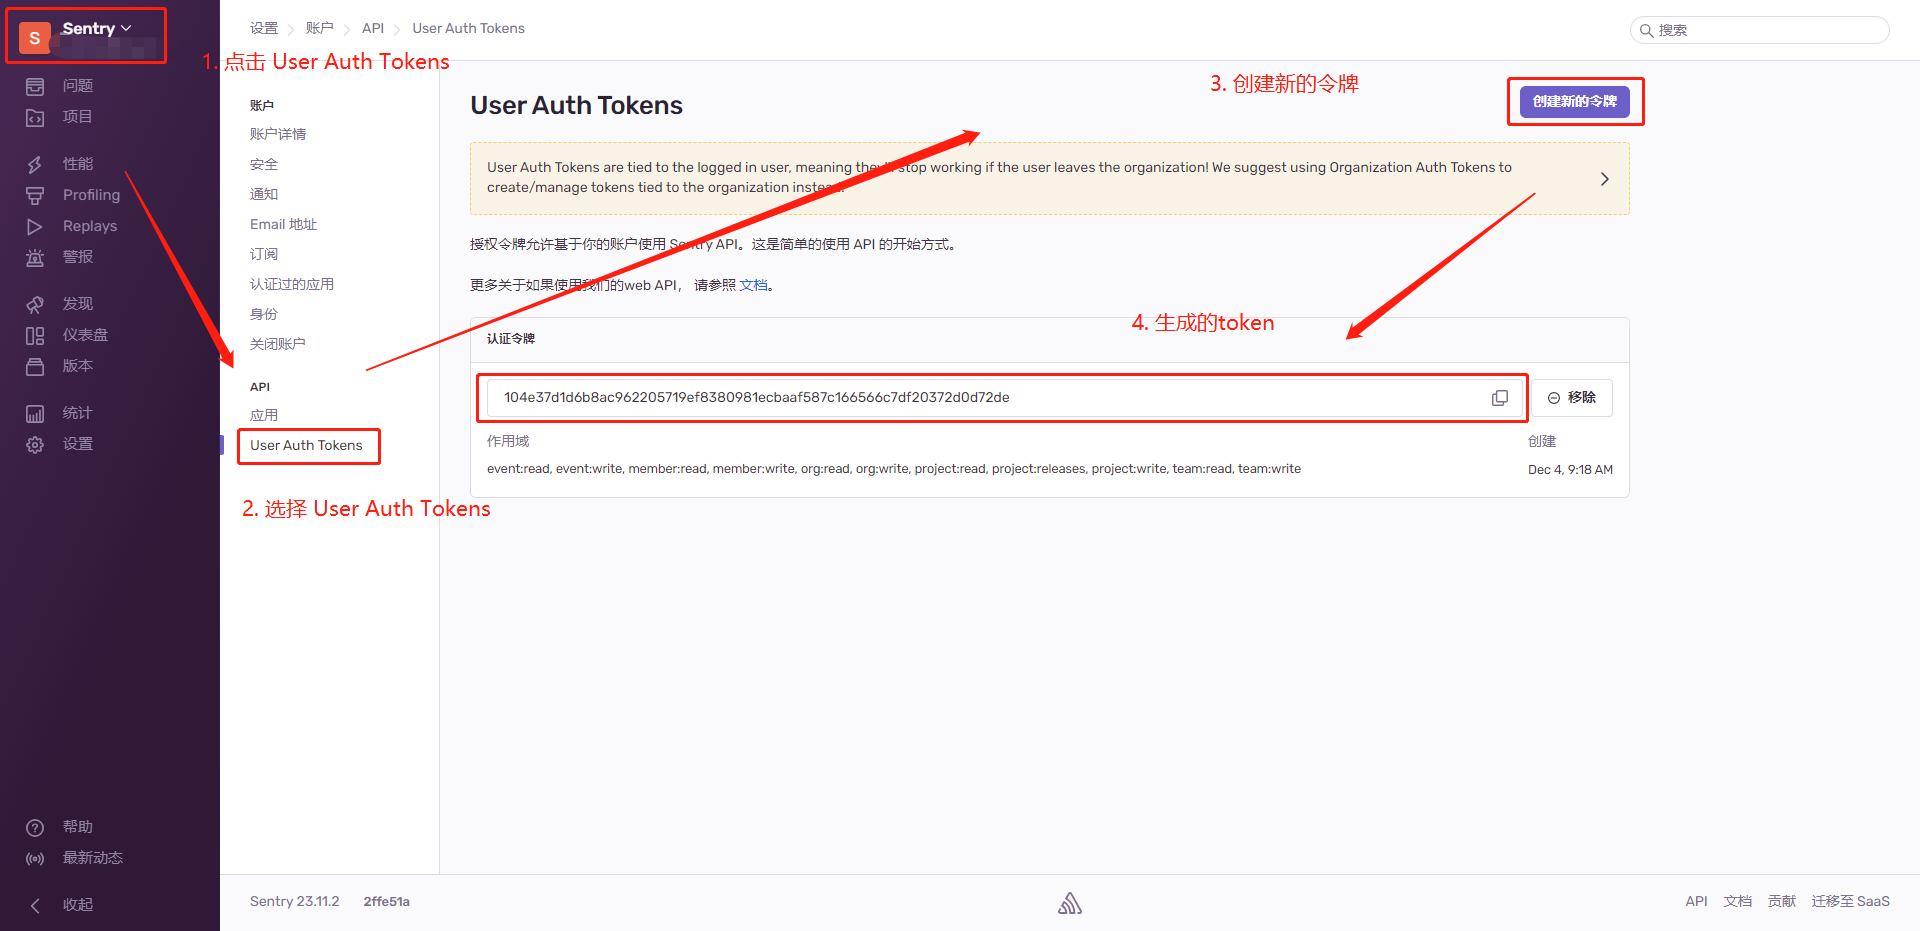
这时,只要复制token到终端,就可以完成登录流程了,如下所示,就是成功登录了Sentry在线系统:
Enter your token: 104e37d1d6b8ac962205719ef8380981ecbaaf587c166566c7df20372d0d72de
Valid token for user test001

Stored token in /Users/weihao/.sentryclirc
dstweihao@weihao-mac-mini vue %
上传
SourceMap到Sentry在线系统,登录成功之后,就需要将SourceMap文件上传到Sentry在线系统,首先,需要在项目里新建一个.sentryclirc文件,里面的内容,如下所示:[defaults] url=http://123.11.22.133:211/ org=sentry project=test [auth] token=104e37d1d6b8ac962205719ef8380981ecbaaf587c166566c7df20372d0d72de然后使用以下命令:
sentry-cli releases -o sentry -p test files test@1.0.0 upload-sourcemaps './dist/assets/' --url-prefix '~/test/js'这里需要对该命令一些参数说明一下:
sentry:组织名test:项目名1.0.0:版本号,需和main.ts里的release: 'test@1.0.0'一致。./dist/assets/:项目打包生成的dist里.map文件所在目录~/test/js:如果部署在服务器上面,不是部署在主目录,而是在test文件夹下面,那就需要加上在终端显示如下,就表示已经上传成功:
> Found 2 release files
> Analyzing 2 sources
> Analyzing completed in 0.47s
> Rewriting sources
> Rewriting completed in 0.534s
> Adding source map references
> Bundling files for upload... ~/test/js/index-o3HPk7Oz.js.map
> Bundling completed in 0.855s
> Optimizing completed in 0.017s
> Uploading completed in 12.873s
> Uploaded release files to Sentry
> Processing completed in 0.129s
> File upload complete (processing pending on server)

Source Map Upload Report
  Minified Scripts
    ~/test/js/index-o3HPk7Oz.js (sourcemap at index-o3HPk7Oz.js.map)
  Source Maps
    ~/test/js/index-o3HPk7Oz.js.map
此时,我们可以在
Sentry在线系统上面查看到上传的sourcemap文件,如下图所示: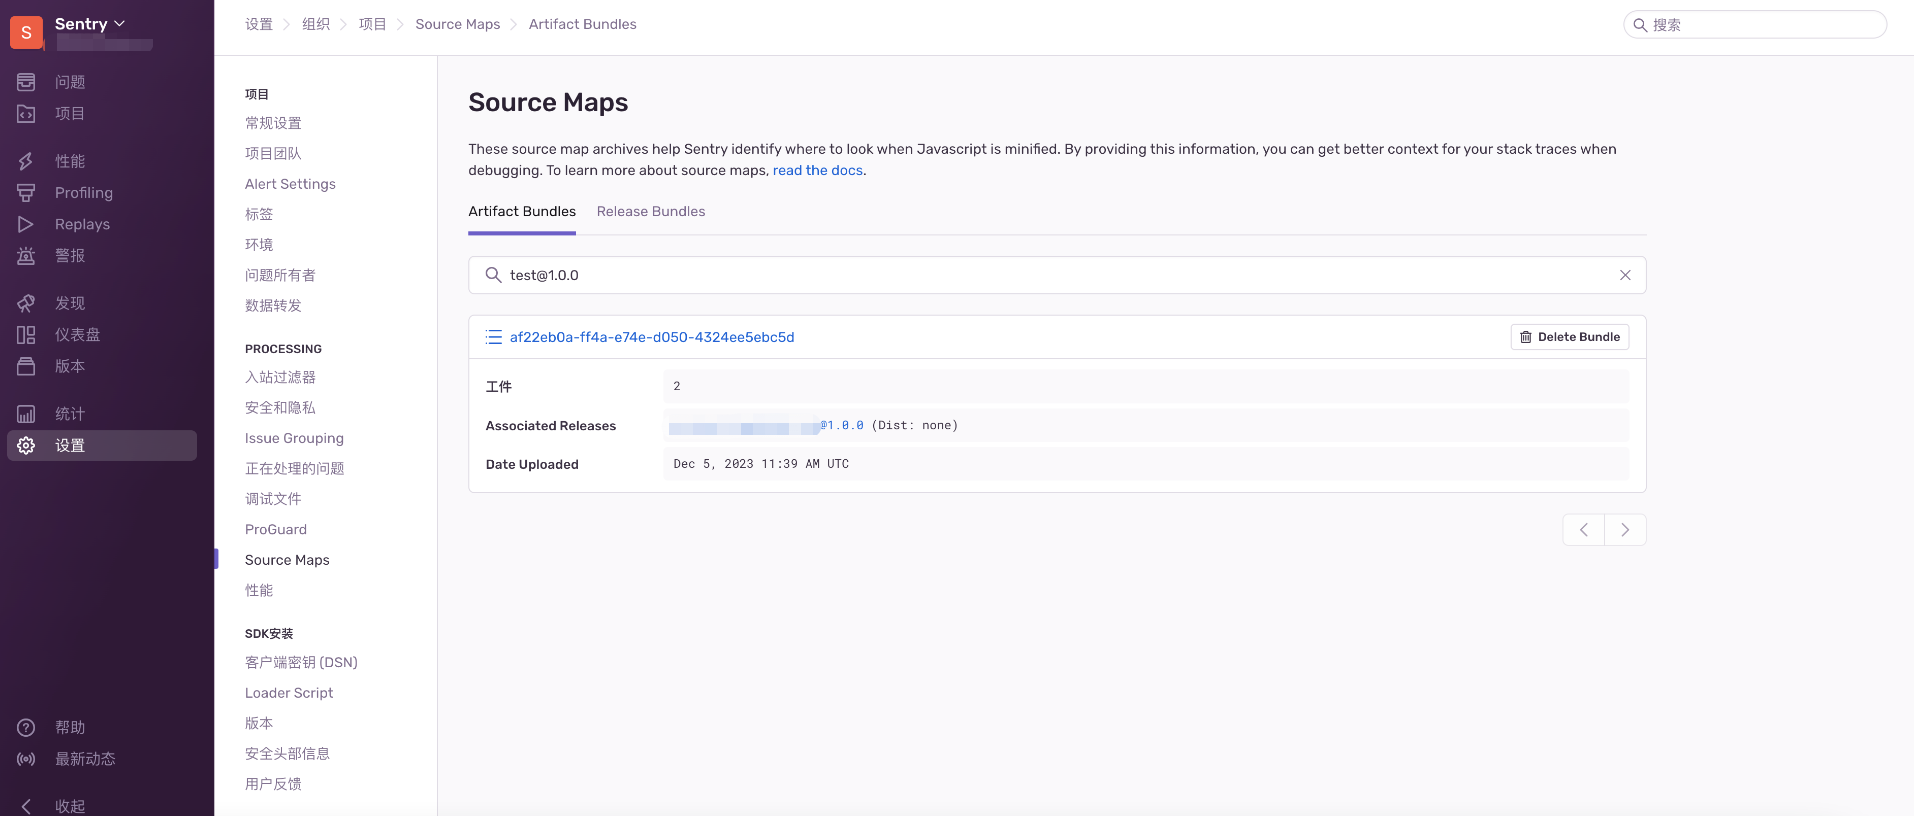
7. 其他
- 中英文切换:设置 — 账户 — 详细信息 — 账户详情 — 语言 — Simplified Chinese
- 时区设置:设置 — 账户 — 详细信息 — 账户详情 — 时区 — Shanghai